The drought of March has pierced unto the root
And bathed each vein with liquor that has power
To generate therein and sire the flower;
When Zephyr also has, with his sweet breath,
Quickened again, in every holt and heath,
The tender shoots and buds, and the young sun
Into the Ram one half his course has run,
And many little birds make melody
That sleep through all the night with open eye
(So Nature pricks them on to ramp and rage)-
Then do folk long to go on pilgrimage,
And palmers to go seeking out strange strands,
To distant shrines well known in sundry lands.
And specially from every shire’s end
Of England they to Canterbury wend,
The holy blessed martyr there to seek
Who helped them when they lay so ill and weak.
-Geoffrey Chaucer, Prologue to The Canterbury Tales
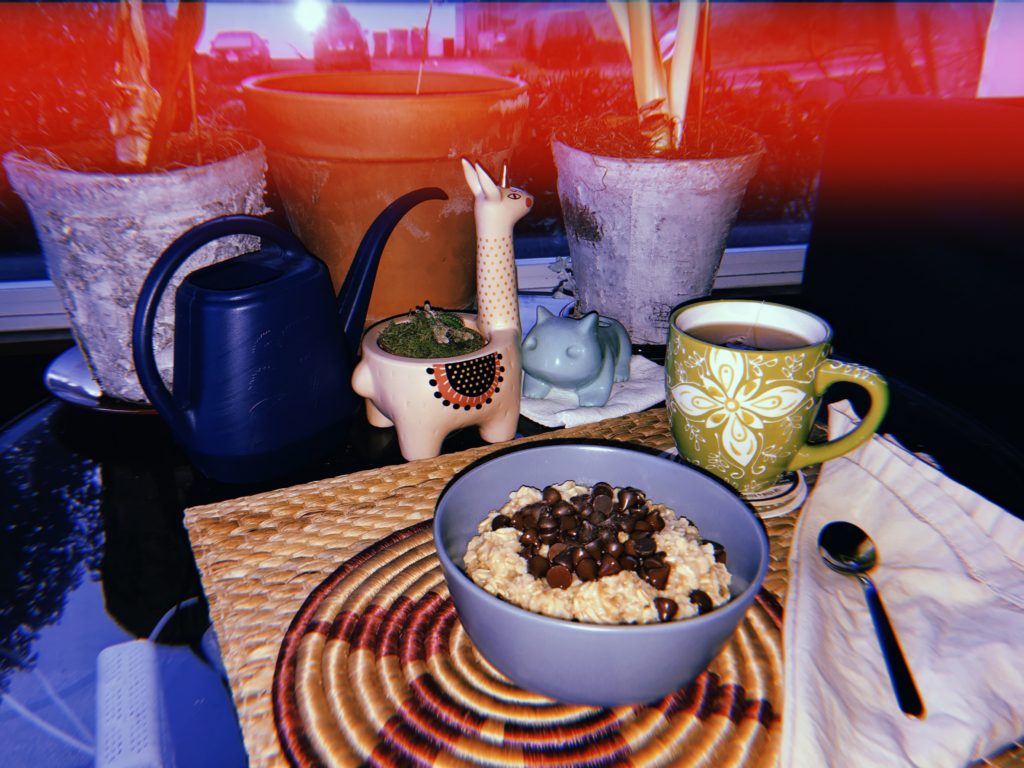
yes, you read that right. this is not a recipe for chocolate chip oatmeal cookies (although i do have a great one written in a notebook somewhere…i should try to dig that out). this is a recipe for chocolate chip cookie oatmeal.
the thing is, we all act like eating cookies for breakfast is crazy, but we all do it anyway. what is cookie crisp, if not mini cookies in a bowl drenched in milk? what is a waffle, if not a puffy, crispy, gridded cookie? what is an omelette, if not a cookie, made of eggs then rolled around a bunch of savory stuffings?
i’ll admit that i may have lost the analogy there, but i’ll never admit defeat on the cookie-flavors-for-breakfast issue! because this breakfast i just made for myself as a wfh-treat is just as much brown sugar and butter and chocolate chips as it is oatmeal, and it is damn good.
Print Recipe
Chocolate Chip Cookie Oatmeal
make it for breakfast! eat it and get hopped up on sugar! do whatever you want- your parents aren't here!
bring water and salt to a boil in a small pan. when water is at a full rolling boil, add in oatmeal and reduce heat to low.
simmer on low until oatmeal is soft and water is mostly absorbed/evaporated, about 7-10 minutes (depends on how you like your oatmeal, really). when oatmeal is cooked to your satisfaction, remove from heat.
off heat, mix in butter, brown sugar, and vanilla. add chocolate chips to your taste, and mix until they're just distributed, but not totally melted into the oatmeal. top with a sprinkle of more chocolate chips, and a sprinkle of kosher salt.
chinese food is great, but if you have an allergy to sesame, it becomes a death trap. unfortunately, my husband has a sesame allergy, so a lot of asian food has been out of the question for us. i’ve been left with no choice but to learn how to make it myself!
the great thing about this recipe (other than not killing my husband) is that it’s just as tasty as regular take out, but it’s not; it’s a lot cheaper and arguably healthier. it’s also pretty easy to make and can be adjusted for spiciness.
honestly, what’s not to like? go make it now!
Print Recipe
Cashew Chicken Stir Fry
easy, spicy, weeknight stir fry. homemade junk food at its finest.
dice chicken thighs into small chunks and brown in a wok. season with salt and pepper while it browns. dice the onion and green pepper into similarly sized chunks while chicken cooks.
once chicken begins to brown, add in your diced onion and green pepper.
combine soy sauce, brown sugar, oyster sauce, chili garlic sauce, and minced ginger. when chicken is nearly done and onion and green pepper have just started to soften, add in sauce and reduce heat to low.
roughly chop cashews. combine corn starch and water to make a slurry. add them both to the wok and stir to combine. continue to simmer on low until sauce thickens and becomes glaze-like and cashews soften slightly. serve with rice or noodles.
i’m trying to eat less meat to save the planet and also save more money on groceries. that’s super hard, though, so i’ve been transitioning into this meat-less lifestyle by cutting out red meat and turning to ground turkey alternatives.
eventually, i’d like to eat no meat, but in the meantime these ground turkey recipes have been healthy and have significantly cut down on our grocery bills. and they’ve saved us from eating rice and beans every night until i learn to cook more vegetarian food.
i based this recipe off of this fantastic recipe for turkey taco meat from allrecipes. i wasn’t exactly sure what’ we’d do with it, but after scanning the ingredients in the fridge, we decided burritos would be the best option.
and they were the best. like, fast food, chipotle good. like, i’m eating one cold at my desk and work right now, and it’s still good (see pic). i recommend making up a big batch, then storing them rolled in aluminum foil and bagged in ziplocs. i haven’t tried freezing these, but i suspect that would work as well.
Print Recipe
Turkey Burritos
good burritos made with cheap and healthy ground turkey.
combine first 8 ingredients (all the spices) in a bowl so that your spice mixture is ready when you need it. heat olive oil in a skillet and add onions, cooking until they're soft, 3-4 minutes. add in turkey, break up with a spoon, and cook until it browns, 3-5 minutes.
add in water and chili powder mixture, stir to distribute evenly. reduce heat and simmer about ten minutes until the liquid is reduced.
stir in apple cider vinegar and brown sugar and simmer for an additional 3-4 minutes. remove meat from heat and let cool slightly.
mix the broccoli slaw with the sour cream and season with salt and pepper while meat cools.
assemble your burritos! add in your meat, slaw mixture, cheese, salsa, and avocados. go crazy! you can also add other stuff not listed here! to roll, place each burrito on a square of aluminum foil. tuck both the sides in, then pull the bottom half of the burrito up over the toppings, tucking the edge of the bottom half up against the toppings. roll tightly towards the top of the burrito. it'll already be sitting on top of the aluminium foil, so just wrap it up and you're good to go!
i never enjoy salad. usually, i just force my way through it bite by bite while i daydream about all the good snacks I’m going to eat later when i’m alone. my point here is that if I’m recommending a salad on here, it’s probably a pretty good salad.
this is another one of my mother-in-law’s recipes. i don’t know where she got the recipe, but I’ve been scarfing it down at her house for as long as i’ve been with my husband.
i think the key to this salad is that it’s simple, so there aren’t a lot of ingredients to pick through and contend with, and it makes a great side dish because it has vegetables AND rice. it would probably even make a good main dish, if you eat enough of it.
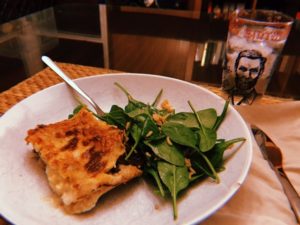
i usually serve this with some grilled or pan-fried chicken thighs, but yesterday was sunday and i wanted to make a big dinner, so we had it with this amazing mushroom lasagna.
Print Recipe
Judy's Spinach and Rice Salad
A great accompaniment to meat or hearty pasta dishes. Comes together quickly and easily and (I know it's unbelievable) it actually tastes great!
1bunchgreen onionssliced, some greens and some whites
Instructions
cook rice according to package directions.
while the rice is cooking, combine olive oil, white wine vinegar, soy sauce, black pepper, and turmeric. shake or whisk the combination together until fully combined. add to rice once rice is fully cooked (rice will be a bit wet and oily).
combine spinach, green onions, and rice mixture. the rice acts as a dressing for the spinach leaves; a few will wilt a little- that's ok.
serve! works great as an accompaniment for hearty pasta dishes or meaty main courses.
you know how when you grow up with something you think that’s just how things are but then you find out it was actually specific to your experience? like how i have these weird things in my mouth called tori, but until the dentist told me that they were weird, i thought that was just what mouths were like.
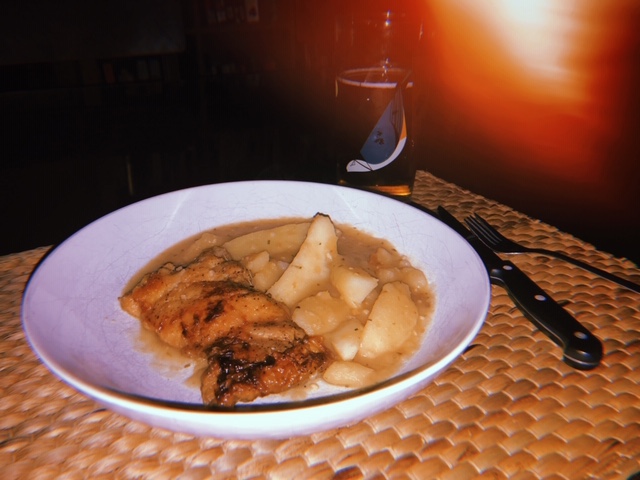
anyway, i grew up thinking that chicken vesuvio was just regular old italian restaurant food, but i’ve recently learned that it’s actually regional to chicago! so i decided to make some for a little taste of my very cold homeland. if you’ve never had chicken vesuvio before, all you need to know is that the potatoes are so good. so soooooo good.
this recipe is adapted from cook’s illustrated complete cooking for two. in addition to making a few changes to the recipe, i have to double everything because apparently dylan and i eat for four. traditional chicken vesuvio would normally have peas in it, but dylan is allergic to peas and i hate them, so i don’t add them. a more traditional version would also use bone in chicken pieces but i think that’s too much work, so i went for boneless instead.
further note: i tried to do some research about the history of chicken vesuvio, but i ended up at this page of people just arguing a lot and being angry and i started getting sort of sad and overwhelmed so i had to quit. research at your own risk.
Print Recipe
Kate's Chicken Vesuvio
A classic Chicago chicken and potatoes dish that comes together easily in one pot.
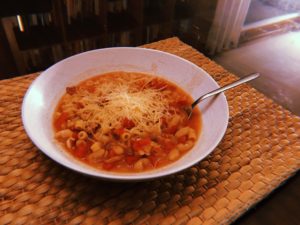
it’s been gloomy for a few weeks here in Seattle, so I decided to get some new soup recipes into my rotation and try out this recipe for Pasta e Fagioli. needless to say, it didn’t disappoint.
this recipe is great because it cooks up quickly, only uses one pot, and looks and tastes way fancier than it is.
while we were eating it, a commercial for olive garden came on and dyl said that this food was probably better than olive garden. so there you go. probably better than olive garden.
Print Recipe
Pasta e Fagioli
Only takes one pot and a few minutes of actual work. Great for rainy days.
Sauteé bacon in a large pot or stockpot over medium-high heat until it begins to brown. You don't need to use any oil, because the bacon has a lot of fat. As the bacon cooks, spoon off some of the fat so that your soup isn't too oily.
Add onion and continue to cook until onion softens, 5-6 more minutes. Add in oregano, garlic, salt, pepper, and red pepper flakes, and cook for 1-2 minutes more.
Add in both cans of tomatoes, scraping up any browned bits on the bottom as the tomato juice boils.
Add in chicken broth and water, and bring to a rolling boil. Add in ditalini and cook at a rolling boil for 9 minutes. When ditalini is cooked, move soup from heat and cool slightly before serving (it will be HOT!).
I made up this recipe with some random stuff I had around the house. The result was so good that we ate too much and didn’t have enough leftovers for lunch the next day.
You can pretty much always make a great stir fry with a combination of some meat, a chili garlic/soy sauce, and some form of noodles or rice. Beyond those three things, you can pretty much put any kind of veggies you want in it.
I use an equal part chili garlic sauce because we like it spicy, but you could always cut back on it if you want a milder dish.
Print Recipe
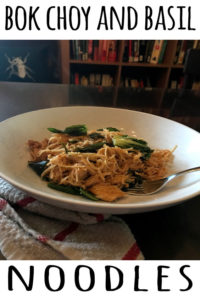
Bok Choy and Basil Rice Noodles
Spicy stir fry with bok choy, basil, chicken, and rice noodles.
Set the rice noodles to soak in a pot of cold water set on the stove for ten minutes.
While the rice noodles soak, thinly slice and dice the chicken breast. Place chicken breast in a bowl, and pour 1/3 of soy sauce over it, stirring to make sure all chicken pieces are coated. Season chicken with salt and pepper.
Once rice noodles have soaked for ten minutes, turn on the heat, and bring the water to a rolling boil. Boil for about ten minutes.
Heat olive oil in a large wok or skillet. Cook chicken until golden brown and cooked through, about 5-7 minutes.
While chicken is cooking, whisk together the chili garlic sauce, oyster sauce, and remaining soy sauce. Add to pan with chicken and reduce heat to low.
By this time, the rice noodles should have soaked for at least ten minutes. While the chicken simmers on low, bring the rice noodles to a boil and cook at a rolling boil for 10 minutes.
Drain rice noodles, add to pan with chicken and sauce and stir to combine.
Move the wok from the heat and stir in bok choy and basil. Keep stirring it until the bok choy wilts into the dish.
This recipe belongs to my mother-in-law, but I was lucky enough to be able to snap a picture of it the last time we saw her (at pizza night, of course!). My mother-in-law makes amazing pizzas with really unique and tasty topping combinations (one of her classics is an asparagus, gorgonzola, and carmelized onion that I sincerely hope to feature here someday).
With a crust like this, though, the toppings are really an afterthought. This crust will come out right every time and can hold up to all kinds of toppings, classic or crazy. Basically, if you master this crust, the whole world of pizza is open to you. Take hold of your destiny.
This is a thin pizza crust that cooks up crunchy and crispy, but I wouldn’t quite call it a “thin crust” pizza, since this recipe has enough baking powder and yeast in it to give it a little lift and a hint of bready texture. To me, it tastes like a classic homemade pizza crust. Also, you can prepare it ahead of time and then top it and cook it up once your guests arrive. Get ready for pizza night!
Print Recipe
Judy's Homemade Pizza Crust
Basic pizza crust that comes out right every time. A little crispy, a little bready, and sturdy enough to hold up to a whole heap of toppings. Pizza night has arrived!
In the bowl of a standing mixer, whisk flour, semolina, yeast, baking powder, and salt together.
Add in 2 tbsp of the olive oil and the beer and knead with the dough hook on low. Continue to knead, until ingredients come together as a dough, about 5-10 minutes. My dough was a little dry, so I added 2 tbsp of water to help it come together.
Knead the dough with your hands a few times to form a cohesive ball. Cover bowl with a clean kitchen towel and let rise in a warm place for at least 30 minutes, up to 2 hours. Warning: this isn't the typical pillow-y pizza dough, so it won't rise a whole lot. Don't worry. It's going to be fine.
While the dough is rising, prepare all your toppings. You'll want to have them ready to go before you put the dough in the oven.
Preheat oven and pizza stone to 500°F. Divide dough into two equally sized balls.
Line countertop with parchment paper, and roll dough into a 12-14 inch circle with a rolling pin (dough should be a little less than 1/4 inch thick). This isn't the typical stretchy elastic pizza dough, so it's easier to roll it with a rolling pin than it is to use a more traditional stretching method.
Drizzle rolled-out pizza crust with 1 tbsp olive oil and spread to coat pizza evenly. Don't bother with a brush here; it works best to use clean hands.
Slide the pizza dough and the parchment (you're basically never going to take your pizzas off the parchment) onto the preheated pizza stone and pre-bake, untopped, for 4 minutes. The crust will get bubbly and patchy brown. Pull it out early if the edges start to blacken.
Slide pre-baked crust and parchment out of the oven (a pizza peel is obviously the best tool for this, but I used a cookie sheet since I don't have one of those).
Add toppings to your preheated crust. This is a sturdy crust that can handle a lot of toppings, but keep in mind that you will have to slide your pizza in and out of the oven one more time, so don't go too crazy.
Slide your topped pizza, parchment and all, back onto the pizza stone. Bake about 10 minutes more, until edges begin to blacken and cheese is bubbly and patchy brown.
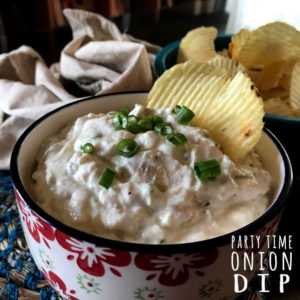
In honor of the Oscars this weekend, here’s an onion dip recipe that’s worthy of an Oscars viewing get-together or for snacking out all on your onion.
I’m a big fan of the classic onion dip my mom always makes: sour cream and a packet of Lipton’s onion soup mix. Lately I’ve taken to subbing greek yogurt for the sour cream to make it just a slight bit healthier (it helps offset the bags and bags of chips I eat, at least).
This recipe goes even further and uses greek yogurt, fresh green onions, and carmelized onions from scratch. I like this with Ruffles, or any potato chips with ridges, or…well, really with any potatoes for that matter. You could also serve this as a dip for fresh veggies, if you’re one of those people.
Print Recipe
Onion Dip from Scratch
Onion dip from scratch that's great for a party or for snacking out all on your own!
Slice root ends off onions, cut onions in half, peel off outer layer, and then slice onions from root to tip, about 1/2 inch thick.
Breaking up the onions into silvers with your hands, add to a large saucepan or skillet (make sure it has a tight fitting lid) along with the water, vegetable oil, and 3/4 tsp of the salt.
Bring the onion mixture to a simmer over medium-high heat, cover, and reduce heat to low, and cook 10 minutes longer, until most of the water has evaporated.
Remove cover, and increase heat to high to evaporate any remaining water. Using a spoon, press the onion to the bottom and sides of pan, allowing it to brown. Stirring the onion mixture frequently, cook over medium-high heat (be careful not to let the onions burn) until onions are soft and fairly brown, about 10 minutes longer.
Transfer onions to a cutting board to cool. While onions cool, combine greek yogurt, onion powder, garlic powder, black pepper, and remaining 1/2 tsp of salt.
Finely mince the green onion. I like to use some of the green part and also some of the white part for more onion-y flavor. Add the minced onion to the greek yogurt mixture and mix well.
When carmelized onions have cooled, roughly chop with a large knife. Some people like bigger chunks of onion than others, so follow your heart.
Add chopped carmelized onion to greek yogurt mixture and mix well to combine. This dip tastes better after it's been in the fridge for awhile so, if you're making this for a party, I recommend making it the day before. A warning, though: this stuff is pretty good.
Good luck not eating it all before the party starts!